基于springboot框架实现P2P技术
P2P技术实践:以P2P下载器为例
前置知识
区块链中点对点技术基础
区块链中的点对点(P2P)技术基础是构建分布式网络的关键部分,它允许网络中的各个节点直接相互通信,无需通过中央服务器。
1. P2P网络的特点
- 去中心化:没有单一的控制点,每个节点都有相同的功能和权利。
- 分布性:数据和服务分布在多个节点上。
- 容错性:即使部分节点失败,网络仍然可以继续运行。
2. 主要组件
- 节点:网络中的每个参与实体,包括全节点、轻节点等。
- 消息传递:节点之间通过网络协议交换信息,包括交易数据、区块信息等
3. P2P网络结构
- 节点发现:新节点加入网络时需要找到其他节点建立连接。这可以通过引导节点、预先配置的节点列表或DNS种子等方式实现。
- 消息传播:节点间的消息传播机制,确保交易和区块信息在整个网络中迅速扩散。
- 网络拓扑:节点之间的连接模式,可以是完全去中心化的,也可以是混合型的(例如超级节点模型)。
4. 典型应用
- 比特币网络:比特币是最早采用P2P技术的区块链之一,其P2P网络允许节点间直接交换交易数据和区块信息。
- 以太坊网络:以太坊同样采用了P2P网络来支持智能合约的执行和交易确认。
P2P下载器概述
P2P下载器是一类用于获取大文件或数据的应用程序,利用点对点技术(P2P)实现高效的下载过程。与传统的中心化下载方式不同,P2P下载器允许用户从多个源同时下载文件,提高了下载速度和资源利用率。这种技术在文件共享、内容分发等领域有着广泛的应用。
P2P 下载器工作原理
- 种子文件创建:上传者创建一个种子文件,其中包含了要下载文件的元信息,如文件名、大小、哈希值等。这个种子文件会被分享给其他用户,作为下载的起点。
- 连接节点:下载者使用P2P下载器打开种子文件,软件根据其中的信息连接到 P2P网络中的其他节点,这些节点可能是其他下载者或拥有文件的上传者。
- 分块划分:文件被分成较小的块,每个块都有一个唯一的标识符。这些块可以从不同的节点处下载,实现并行下载以提高速度。
- 块选择和下载:下载者从可用的节点列表中选择要下载的块。根据块的可用性和下载速度,P2P下载器动态地选择最优的节点进行下载,从多个源同时获取数据。
- 块共享:下载者下载完成一个块后,也会变成一个可供其他下载者获取的源。这种共享机制使得更多的节点能够参与下载,提高整体的下载效率。
- 文件组装:下载者完成所有块的下载后,P2P下载器会将这些块按照原始文件的结构和顺序进行组装,生成完整的文件。
使用springboot框架实现本地文件的转移
1. springboot基础架构
Spring Boot 应用程序通常遵循分层架构设计原则,其中最常见的是三层架构:Controller、Service 和 Repository。每一层都有其特定的责任,这种分层有助于保持代码的清晰、可维护性和可测试性。以下是各层的基本介绍:
- Controller 层
- Service 层
- Repository 层
2. Path类简介
在Java中,java.nio.file.Path 类是Java 7引入的一个新类,用于表示文件系统的路径。它提供了对文件路径的高级抽象,使得处理文件路径变得更加简单和一致。
主要特点
- 平台无关性:
Path 类支持跨平台的操作,可以自动处理不同操作系统之间的路径差异(例如Windows使用反斜杠\,Unix/Linux使用正斜杠/)。
- 路径操作:
Path 类提供了一系列静态工厂方法和实例方法,用于创建和操作路径,如解析路径、获取父路径、获取文件名等。
- 与文件系统集成:
Path 类与FileSystem紧密集成,可以轻松地获取文件系统的相关信息。
我们新建一个sprintboot项目,导入maven,然后点击重新加载所有Maven项目即可
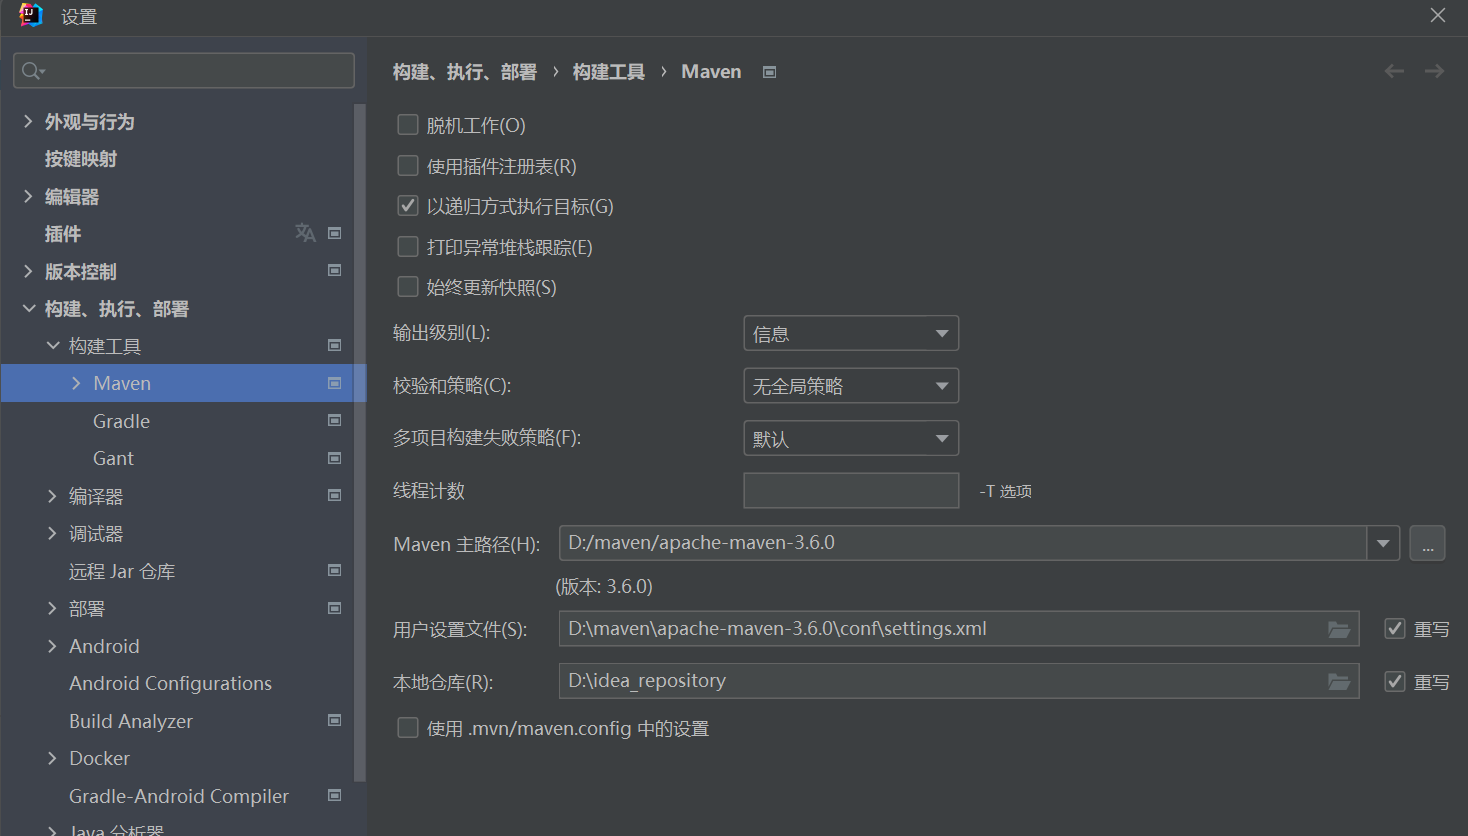
导入springboot依赖,点击刷新maven就会去镜像仓库下载文件
1
2
3
4
5
6
7
8
9
10
11
12
13
14
15
16
17
18
19
20
21
22
23
24
25
26
27
28
29
30
31
32
33
34
35
36
37
38
39
40
41
42
43
44
45
46
47
48
49
50
51
52
53
54
55
56
57
58
59
60
61
62
63
64
65
66
67
68
69
70
| <?xml version="1.0" encoding="UTF-8"?>
<project xmlns="http://maven.apache.org/POM/4.0.0"
xmlns:xsi="http://www.w3.org/2001/XMLSchema-instance"
xsi:schemaLocation="http://maven.apache.org/POM/4.0.0 http://maven.apache.org/xsd/maven-4.0.0.xsd">
<modelVersion>4.0.0</modelVersion>
<parent>
<groupId>org.springframework.boot</groupId>
<artifactId>spring-boot-starter-parent</artifactId>
<version>2.4.0</version>
<relativePath/>
</parent>
<groupId>org.example</groupId>
<artifactId>test_p2p</artifactId>
<version>1.0-SNAPSHOT</version>
<properties>
<maven.compiler.source>8</maven.compiler.source>
<maven.compiler.target>8</maven.compiler.target>
<project.build.sourceEncoding>UTF-8</project.build.sourceEncoding>
</properties>
<dependencies>
<dependency>
<groupId>org.springframework.boot</groupId>
<artifactId>spring-boot-starter-web</artifactId>
</dependency>
</dependencies>
<build>
<plugins>
<plugin>
<groupId>org.apache.maven.plugins</groupId>
<artifactId>maven-compiler-plugin</artifactId>
<version>3.1</version>
<configuration>
<source>${java.version}</source>
<target>${java.version}</target>
<encoding>${project.build.sourceEncoding}</encoding>
</configuration>
</plugin>
</plugins>
</build>
<repositories>
<repository>
<id>public</id>
<name>aliyun nexus</name>
<url>https://maven.aliyun.com/repository/public</url>
<releases>
<enabled>true</enabled>
</releases>
</repository>
</repositories>
<pluginRepositories>
<pluginRepository>
<id>public</id>
<name>aliyun nexus</name>
<url>https://maven.aliyun.com/repository/public</url>
<releases>
<enabled>true</enabled>
</releases>
<snapshots>
<enabled>false</enabled>
</snapshots>
</pluginRepository>
</pluginRepositories>
</project>
|
然后创建test软件包,创建PathExample类进行测试
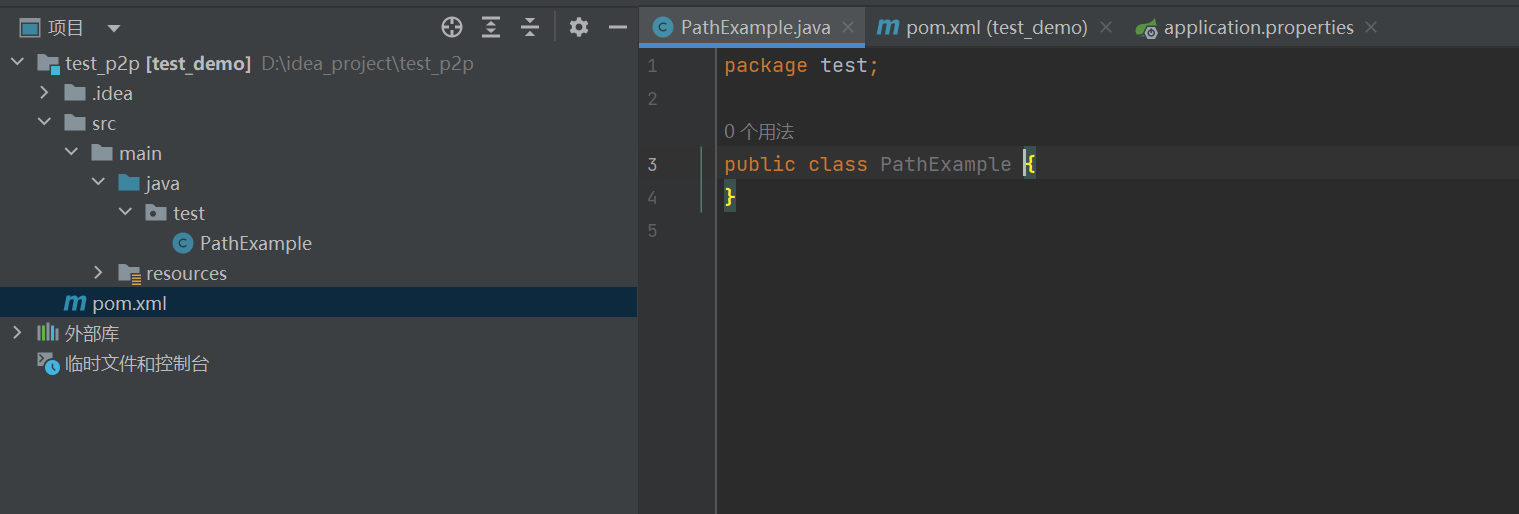
测试代码如下
1
2
3
4
5
6
7
8
9
10
11
12
13
14
15
16
17
18
19
20
21
22
23
24
25
26
27
28
29
30
31
32
33
34
35
36
37
| package test;
import java.nio.file.Path;
import java.nio.file.Paths;
import java.sql.SQLOutput;
public class PathExample {
public static void main(String[] args) {
Path path = Paths.get("D:\\idea_project\\test_p2p\\test\\hello.txt");
Path parentpath = path.getParent();
System.out.println("Parent_path: " + parentpath);
Path fileName = path.getFileName();
System.out.println("File name: " + fileName);
Path resolvedPath = parentpath.resolve("test1\\hello1.txt");
System.out.println("Resolve_path: " + resolvedPath);
Path normalizedPath = path.normalize();
System.out.println("Normalized path: " + normalizedPath);
Path absolutePath = path.toAbsolutePath();
System.out.println("Absolute path: " + absolutePath);
java.io.File file = path.toFile();
System.out.println("File object: " + file);
}
}
|
执行结果如下(这里需要注意解析相对路径是解析父路径)

3. File类简介
java.io.File 类在Java中用于表示文件系统中的文件和目录。它提供了一组方法来创建、删除、重命名文件或目录,以及获取文件的各种属性,如文件大小、最后修改时间等。注意:File类只能操作文件或文件夹本身,不能读写文件里面的数据。
主要特点
- 文件和目录操作:
File 类提供了创建、删除、重命名文件或目录的方法。- 可以检查文件是否存在、是否为目录或文件等。
- 文件属性:
- 可以获取文件的路径、名称、大小、最后修改时间等属性。
- 文件列表:
创建FileExample类,测试代码如下
1
2
3
4
5
6
7
8
9
10
11
12
13
14
15
16
17
18
19
20
21
22
23
24
25
26
27
28
29
30
31
32
33
34
35
36
37
| package test;
import java.io.File;
import java.io.IOException;
public class FileExample {
public static void main(String[] args) throws IOException{
File file = new File("D:\\idea_project\\test_p2p\\test\\hello.txt");
System.out.println("File exists: " + file.exists());
System.out.println("Is directory: " + file.isDirectory());
System.out.println("Is file: " + file.isFile());
System.out.println("Path: " + file.getPath());
System.out.println("Name: " + file.getName());
System.out.println("Parent: " + file.getParent());
System.out.println("Absolute path: " + file.getAbsolutePath());
System.out.println("Length: " + file.length());
System.out.println("Last modified: " + file.lastModified());
File newDir = new File("D:\\idea_project\\test_p2p\\test");
boolean dirCreated = newDir.mkdir();
System.out.println("Created new directory: " + dirCreated);
File newFile = new File("D:\\idea_project\\test_p2p\\test\\hello.txt");
boolean created = newFile.createNewFile();
System.out.println("Create new file: " + created);
File dir = new File("D:\\idea_project\\test_p2p\\test");
String[] files = dir.list();
for (String fileName : files) {
System.out.println("File in directory: " + fileName);
}
}
}
|
在Java中,InputStream 和 OutputStream 是Java标准库中用于处理字节流的基本类。它们分别用于读取和写入字节数据。这两个类及其子类构成了Java中处理文件和其他字节流的基础。
InputStream 是一个抽象类,用于从源读取字节数据。所有的字节输入流都继承自 InputStream。常见的 InputStream 子类包括:
- FileInputStream:从文件系统中的文件读取字节。
- ByteArrayInputStream:从字节数组读取字节。
- ObjectInputStream:用于反序列化对象。
- BufferedInputStream:为其他输入流添加缓冲功能,提高读取效率。
- PipedInputStream:用于线程间的通信,与
PipedOutputStream 配合使用。
OutputStream 同样是一个抽象类,用于向目的地写入字节数据。所有的字节输出流都继承自 OutputStream。常见的 OutputStream 子类包括:
- FileOutputStream:向文件系统中的文件写入字节。
- ByteArrayOutputStream:向字节数组写入字节。
- ObjectOutputStream:用于序列化对象。
- BufferedOutputStream:为其他输出流添加缓冲功能,提高写入效率。
- PipedOutputStream:用于线程间的通信,与
PipedInputStream 配合使用。
5. 在TestController里编写main方法
- FileInputStream:用于从文件系统中的一个文件读取字节。它打开一个从文件系统中的指定文件到应用程序的输入字节流。
- FileOutputStream:用于将数据写入文件系统中的文件。它创建一个向文件系统中的指定文件提供输出的文件输出流。
1
2
3
4
5
6
7
8
9
10
11
12
13
14
15
16
17
18
19
20
21
22
23
24
25
26
27
28
29
30
31
32
33
34
35
36
37
38
39
40
41
42
43
44
45
46
47
48
49
50
| package controller;
import java.io.IOException;
import java.io.FileInputStream;
import java.io.FileOutputStream;
import java.nio.file.Path;
import java.nio.file.Paths;
import java.nio.file.Files;
public class TestController {
public static void main(String[] args) throws IOException{
String sourceFilePath = "D:\\idea_project\\test_p2p\\test\\hello.txt";
String destinationFolderPath = "D:\\idea_project\\test_p2p\\test1\\";
Path sourcePath = Paths.get(sourceFilePath);
Path destFolderPath = Paths.get(destinationFolderPath);
Path destFilePath = destFolderPath.resolve(sourcePath.getFileName());
copyFileToFolder(sourcePath,destFilePath);
}
public static void copyFileToFolder(Path sourcePath, Path destFilePath) throws IOException{
if (!Files.exists(sourcePath)) {
throw new IOException("源文件不存在: " + sourcePath);
}
if (!Files.isDirectory(destFilePath.getParent())) {
throw new IOException("目标文件不存在: " + destFilePath.getParent());
}
try (
FileInputStream fis = new FileInputStream(sourcePath.toFile());
FileOutputStream fos = new FileOutputStream(destFilePath.toFile())
) {
byte[] buffer = new byte[1024];
int bytesRead;
while ((bytesRead = fis.read(buffer)) != -1) {
fos.write(buffer, 0, bytesRead);
}
}
}
}
|
执行结果如下

使用springboot框架实现P2P节点的ip发现
使用的是gitee上的项目,地址:https://gitee.com/daitoulin/p2p_bootstrap.git
打开终端克隆一下

先ipconfig查看下本机ip,然后打开application.properties进行配置引导节点ip
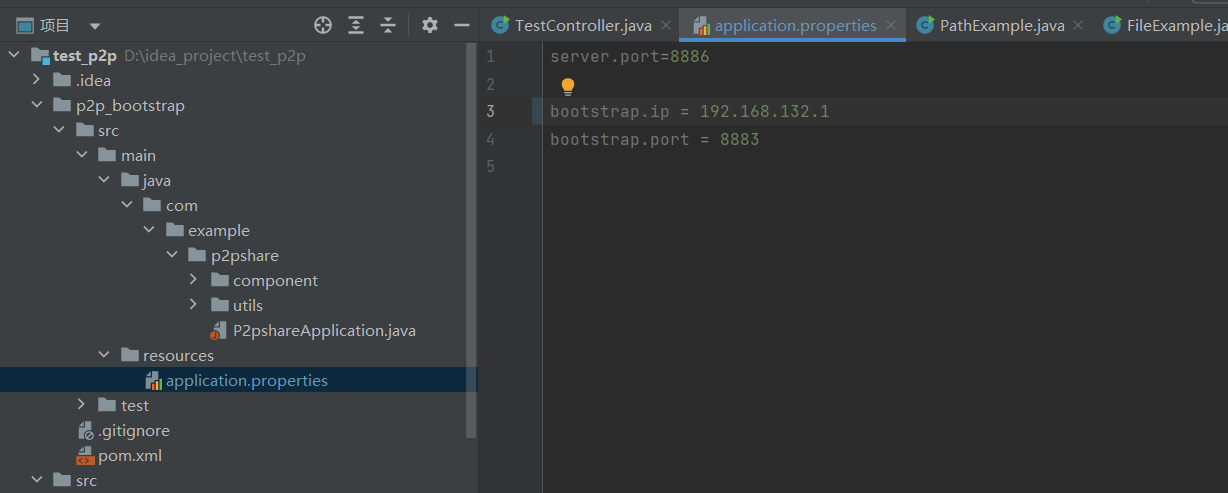
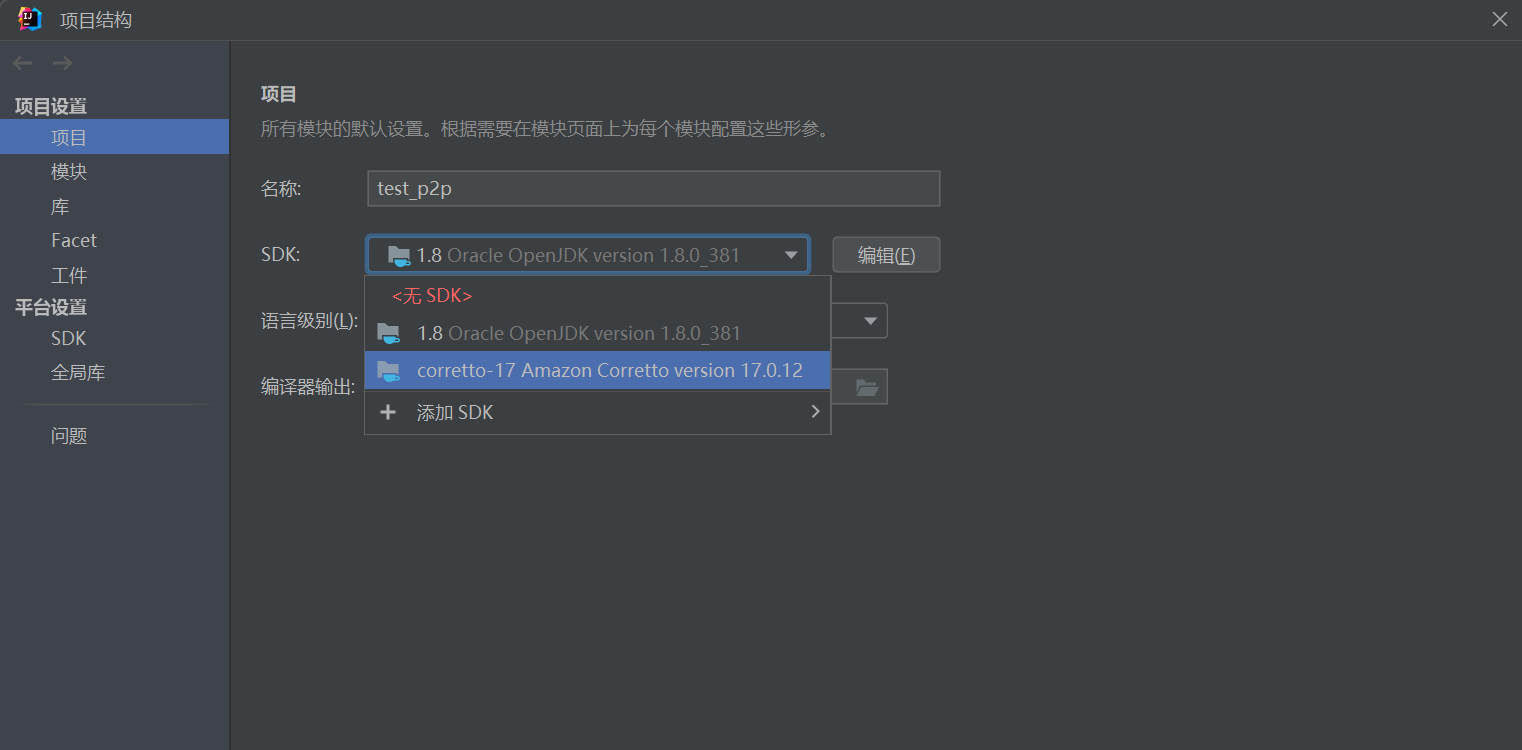
尝试运行发现java8的版本不行
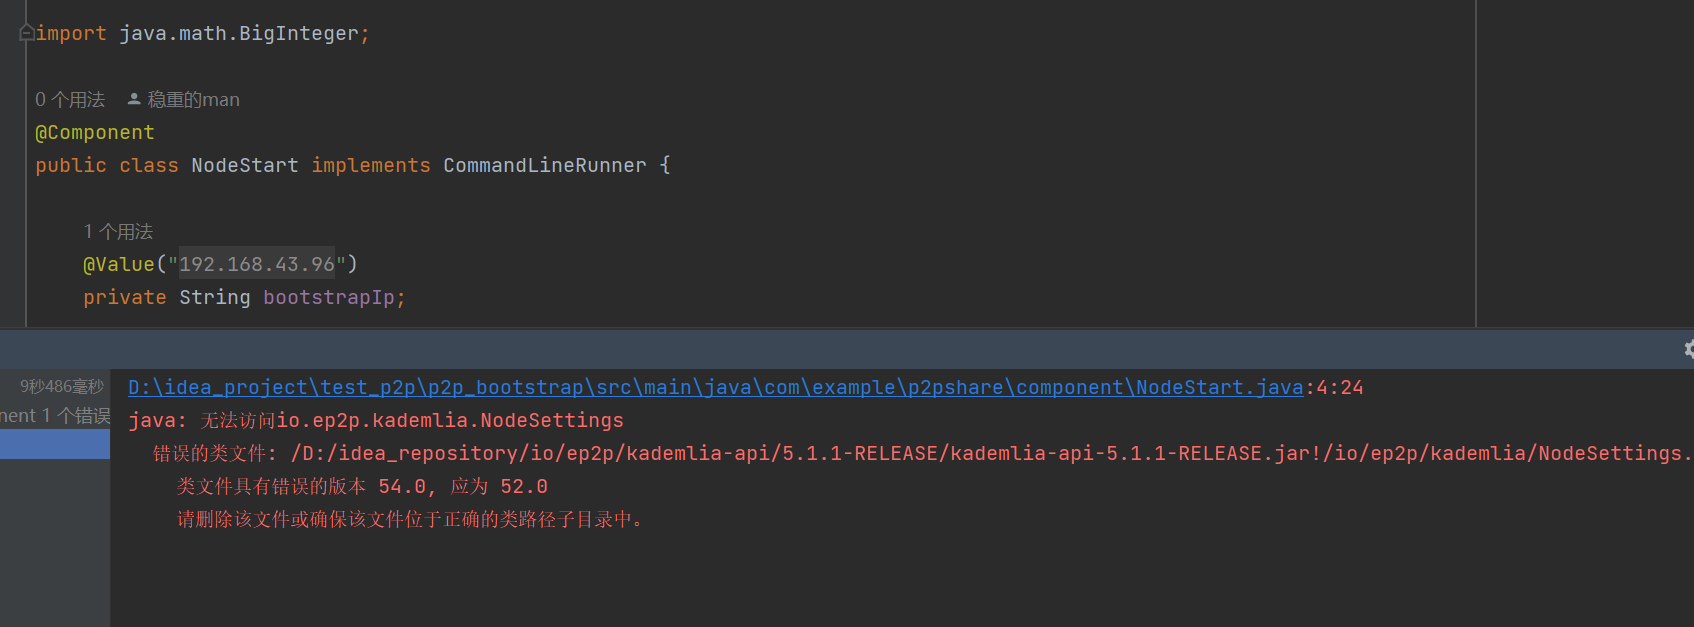
打开项目结构,下载java新一点的版本然后使用
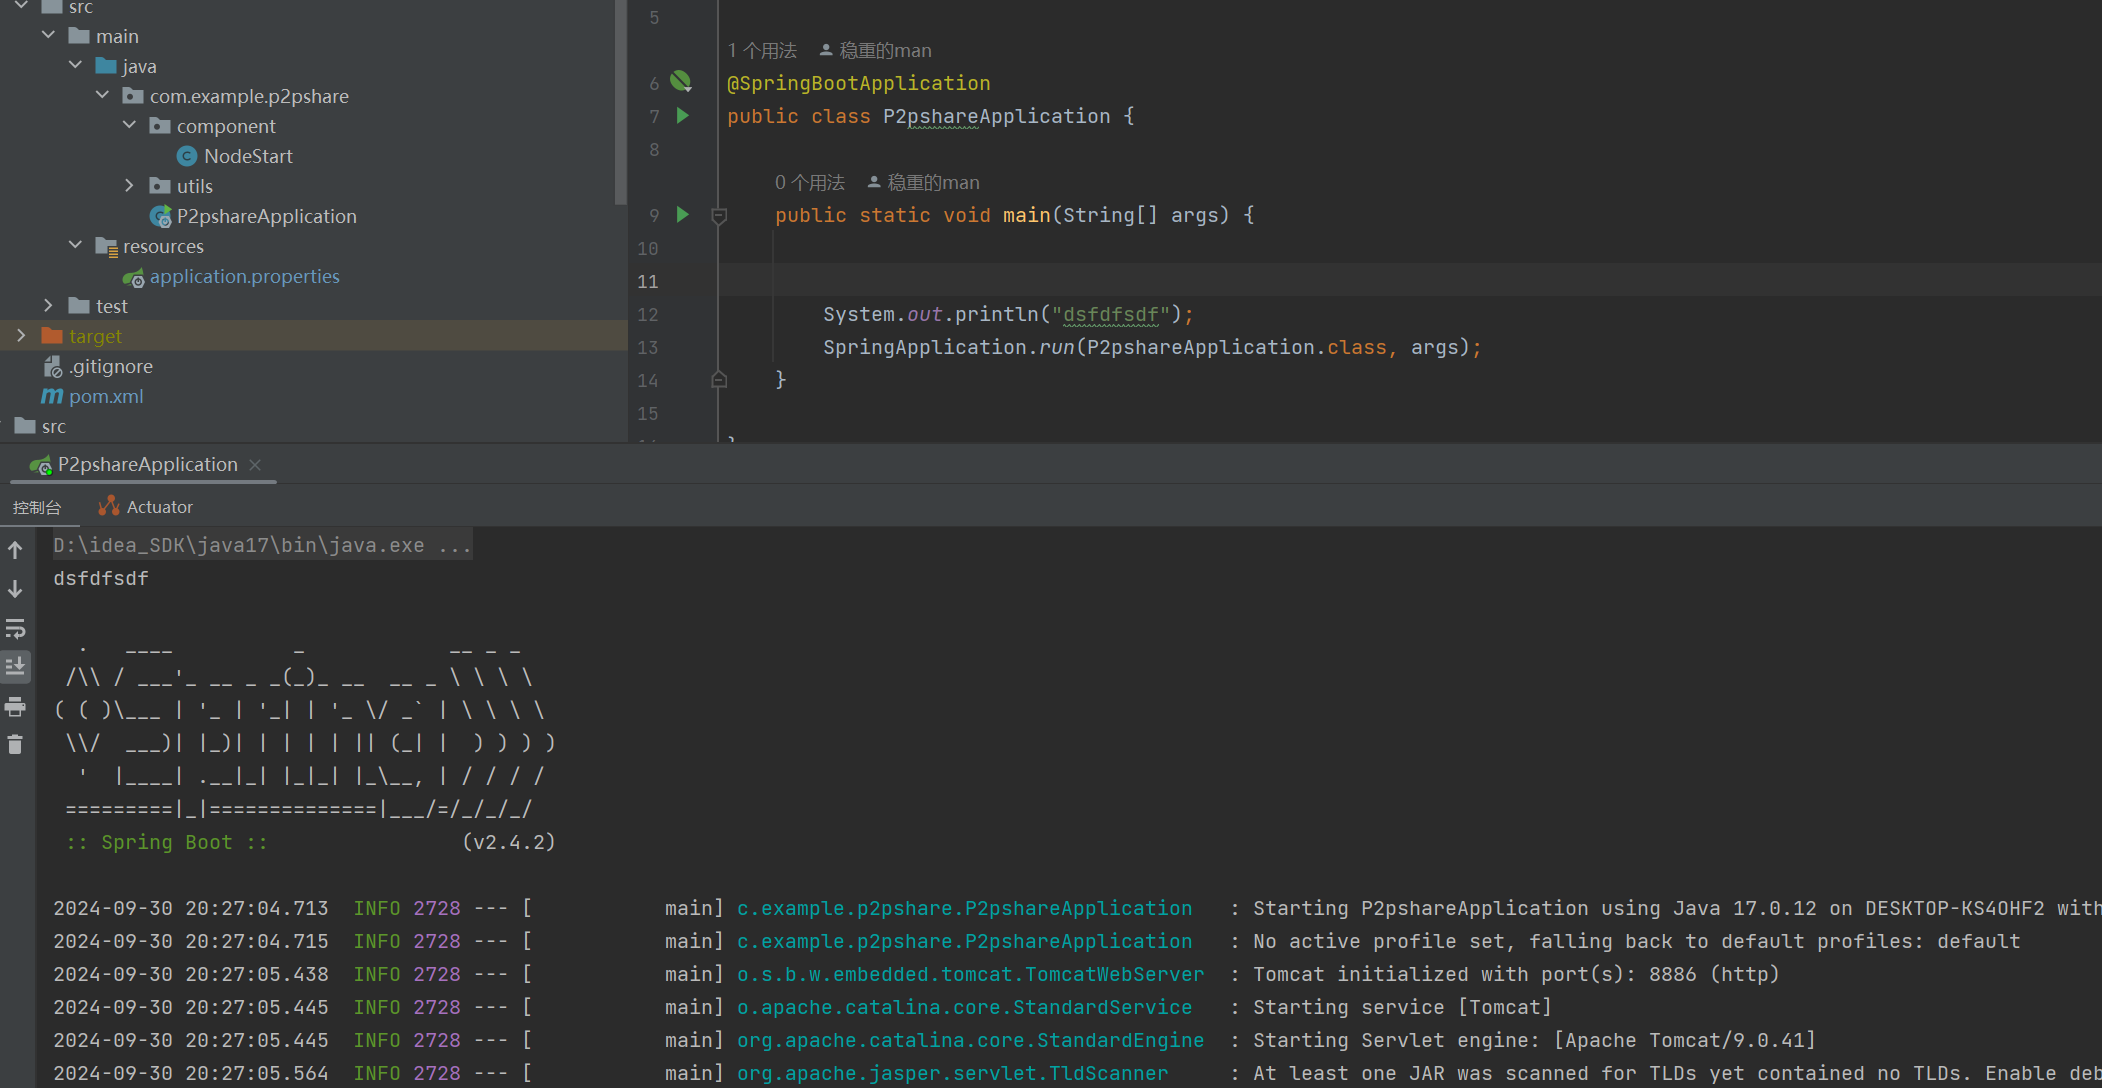
成功运行
使用springboot框架完成两个节点内的文件传输
相关注解
1. @RequestParam
将参数跟随在url的问号后面
1
2
3
4
5
6
7
8
9
| @RequestMapping("/testParam")
public ResponseEntity<JSONResult> testParam(@RequestParam("username") String username) throws IOException {
JSONResult json = JSONResult.getInstance();
json.setCode("200");
json.setMsg("用户名为:" + username);
json.setContent("");
return new ResponseEntity<JSONResult>(json, HttpStatus.OK);
}
|
2. @RequestBody
将参数转为json放在请求体中
3. @PathVariable
/test/{username},绑定最后一个斜杆后面的字符串
1
2
3
4
5
6
7
8
9
| @RequestMapping("/testPathVariable/{username}")
public ResponseEntity<JSONResult> testPathVariable(@PathVariable("username") String username){
JSONResult json = JSONResult.getInstance();
json.setCode("200");
json.setMsg("用户名为:" + username);
json.setContent("");
return new ResponseEntity<JSONResult>(json, HttpStatus.OK);
}
|
4. 不加任何注解的
将自动转为java实体类,一般前端以form-data形式传递
1
2
3
4
5
6
7
8
9
10
11
12
13
14
| @PostMapping("/uploadFile")
public ResponseEntity<JSONResult> testUpload(MultipartFile multipartFile) throws IOException {
JSONResult json = JSONResult.getInstance();
String fileName = multipartFile.getOriginalFilename();
Path targetLocation = Paths.get(shareFilePath, fileName);
multipartFile.transferTo(targetLocation);
json.setCode("200");
json.setMsg("查询成功");
json.setContent("");
return new ResponseEntity<JSONResult>(json, HttpStatus.OK);
}
|
查询指定文件夹下的文件名
思路:创建File类,用循环将所有文件名找出并返回
1
2
3
4
5
6
7
8
9
10
11
12
13
14
15
16
17
18
19
20
21
22
23
24
25
26
27
28
29
30
31
32
33
34
35
36
37
38
39
40
41
42
43
| @RequestMapping("/findDocument")
@CrossOrigin
public ResponseEntity<JSONResult> findDocument(@RequestBody QueryDocument qd) {
JSONResult json = JSONResult.getInstance();
if (qd.getIp() == null) {
json.setCode("401");
json.setMsg("ip为空无法查找");
json.setContent(null);
return new ResponseEntity<JSONResult>(json, HttpStatus.OK);
}
List<String> listFiles = listFiles(shareFilePath);
DocumentInfo documentInfo = new DocumentInfo();
documentInfo.setFileNames(listFiles);
String contentJson = new Gson().toJson(documentInfo);
json.setCode("200");
json.setMsg("查询成功");
json.setContent(contentJson);
return new ResponseEntity<JSONResult>(json, HttpStatus.OK);
}
public List<String> listFiles(String directoryPath) {
File directory = new File(directoryPath);
List<String> fileNames = new ArrayList<>();
if (directory.isDirectory()) {
File[] files = directory.listFiles();
if (files != null) {
for (File file : files) {
if (file.isFile()) {
System.out.println(file.getName());
fileNames.add(file.getName());
}
}
}
} else {
System.out.println("指定路径不是文件夹。");
}
return fileNames;
}
|
查询所有注册的ip
1
2
3
4
5
6
7
8
9
10
11
12
13
14
15
16
17
18
19
20
21
22
23
24
25
26
27
28
29
30
31
| @RequestMapping("/selectIp")
@CrossOrigin
public ResponseEntity<JSONResult> selectIp() {
JSONResult json = JSONResult.getInstance();
NettyKademliaDHTNode<String, String> node = tesst.getNode();
RoutingTable<BigInteger, NettyConnectionInfo, Bucket<BigInteger, NettyConnectionInfo>> routingTable = node.getRoutingTable();
List<String> ipList = new ArrayList<>();
ipList.add(nodeIp);
for (Bucket<BigInteger, NettyConnectionInfo> bucket : routingTable.getBuckets()) {
System.out.println(bucket);
List<BigInteger> nodeIds = bucket.getNodeIds();
if (nodeIds.size() != 0) {
for (BigInteger nodeId : nodeIds) {
ExternalNode<BigInteger, NettyConnectionInfo> nodeInfo = bucket.getNode(nodeId);
NettyConnectionInfo connectionInfo = nodeInfo.getConnectionInfo();
if (connectionInfo.getHost().equals(nodeIp)) {
break;
}
ipList.add(connectionInfo.getHost());
}
}
}
json.setCode("200");
json.setMsg("查询成功");
json.setContent(ipList);
return new ResponseEntity<JSONResult>(json, HttpStatus.OK);
}
|
下载文件
将前端传输的文件名进行拼接,对指定的ip进行请求,收到返回的byte数组,存入本地指定目录
1
2
3
4
5
6
7
8
9
10
11
12
13
14
15
16
17
18
19
20
21
22
23
24
25
26
27
28
29
30
31
32
33
34
35
36
37
| @RequestMapping("/downloadFile")
public ResponseEntity<JSONResult> downloadFile(@RequestBody DownloadInfo dI) throws Exception {
JSONResult json = JSONResult.getInstance();
String url = "http://" + dI.getIp() + ":8888/download/"+ dI.getFileName();
ResponseEntity<byte[]> response = restTemplate.getForEntity(url, byte[].class);
if (response.getStatusCode().is2xxSuccessful()) {
byte[] fileContent = response.();
InputStream inputStream = new ByteArrayInputStream(fileContent);
File localFile = new File(shareFilePath, "received_" + System.currentTimeMillis() + "_" + dI.getFileName());
FileOutputStream fos = new FileOutputStream(localFile);
byte[] buffer = new byte[4096];
int bytesRead;
while ((bytesRead = inputStream.read(buffer)) != -1) {
fos.write(buffer, 0, bytesRead);
}
json.setCode("200");
json.setMsg("保存成功");
json.setContent("");
return new ResponseEntity<JSONResult>(json, HttpStatus.OK);
}else {
json.setCode("-1");
json.setMsg("保存失败");
json.setContent("");
return new ResponseEntity<JSONResult>(json, HttpStatus.OK);
}
}
|
目标机器将指定的文件读取转为byte数组并返回
1
2
3
4
5
6
7
8
9
10
11
12
13
| @RequestMapping("/download/{fileName}")
public ResponseEntity<byte[]> download(@PathVariable String fileName) {
Path path = Paths.get(shareFilePath + fileName);
try {
byte[] fileContent = Files.readAllBytes(path);
HttpHeaders headers = new HttpHeaders();
headers.setContentType(MediaType.APPLICATION_OCTET_STREAM);
return ResponseEntity.ok().headers(headers).body(fileContent);
} catch (IOException e) {
e.printStackTrace();
return ResponseEntity.notFound().build();
}
}
|


